"So what happens, right, when the armored grunts turn armored zeke?" ― Stevie
The Bull is a special zombie in World War Z.
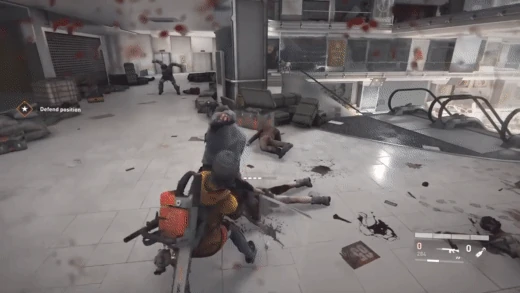
The Bull charges towards his victim at full speed, grabbing them up before pummeling them against the ground over and over until an ally intervenes to free them from his vice-like grip.
Physical Appearance
The Bull is a zeke dressed in urban camouflage clothing underneath a partially damaged police riot suit and a ballistic helmet with a slightly chipped face shield. The number 22 can be seen behind his helmet. A black hood covers his head and neck. His left riot glove is slightly torn, making it fingerless. A nightstick is securely holstered to his right hip.
The Bull's body armor, while mostly intact, has a few ripped areas. The left knee pad is missing and the clothing underneath has been torn off. His left shoulder pad is gone. The back of the Bull contains the bulk of the damage done to his armor as a sizable portion of his vest that protects his back and some of the clothing underneath has been torn up. This area also reveals that the skin and flesh surrounding his vertebrae have been torn open, exposing his spinal column.
The Bull is missing a few teeth, likely due to crashes and collisions as a consequence of his violent ability.
The Bull is easily the biggest and tallest enemy in the game, towering over both survivors and regular zekes by about a head when seen side by side.
Abilities & Behavior
The Bull is an aggressive and relentless zeke. While all zekes are aggressive and relentless in general, the Bull proves himself to push those attributes further beyond that of the average zeke. The behavior that perfectly encapsulates the Bull's accentuated antagonism is best seen and heard when he uses his frighteningly fierce ability. Befitting of his nickname, the Bull can be heard snorting, huffing, and breathing very deeply and heavily.
The Bull has the ability to charge at survivors. When the Bull has chosen his victim and is ready to go, he will stamp his foot and slam his fists together on the ground while roaring. He then goes into a mad dash towards his target, stomping loudly all the way throughout. Should he manage to reach his target, he briefly pulls them up from the ground by the chest with his right hand before smashing them against the floor repeatedly while they are helpless to defend themselves.
The Bull is not afraid to rush directly into a firefight, single out a target, and mercilessly drive them into the ground. His natural toughness combined with his riot armor makes him one of the most fearless, difficult, and ruthless special zombies to take down.
Strategy & Tactics
"The Bull is a mighty beast. If he charges, you better run. He's weaker in the back so try to make your shots count." ― Tutorial Tips
General
- Work together. The Bull can be a difficult zeke to put down and may require everyone alive to work together to kill. While a Bull can certainly be killed by just a single person, your odds against him are simply greater when others are around to help. A collaborative effort with other survivors can swiftly eliminate a Bull with little to no damage taken.
- Never stray too far from your teammates. It is made extremely clear that players that try to do things by themselves will only land in a tight spot that they may not be prepared to face on their own. Having others around, even just one other survivor, might be your only chance of being freed should you managed to be grabbed by him. In higher difficulties, a Bull will be able to incapacitate a survivor in no time flat, making their crushing charges even more unforgiving. Never find yourself alone when up against a raging Bull.
- Listen carefully. The Bull makes distinct growling noises while chasing players. The Bull gets significantly noisier when he is ready to charge. Prepare yourself if you hear a few thumping sounds and a bellowing roar, but especially once you hear the sounds of loud, heavy, and quickly-approaching stomping.
- Watch your fire. The Bull has a lot of health so its important to either unload your best weapons against him or carefully fire at his weak spots. Be careful when shooting at a Bull that has a grip on a survivor. Friendly fire is less forgiving as the difficulty levels increase so while you should always act quickly, control your shots or you may accidentally incapacitate (and even kill) your own teammate in the process of saving them. The same general principle also applies to explosives which can easily do as much, if not more, damage if it lands extremely close to a survivor. Due to this, explosives are ill-advised for saving pinned survivors.
- Watch out for a little notification sign. It is the same one that appears when someone is incapacitated except the white circle will not drain counterclockwise. When it appears, it will lead toward the direction where the pinned survivor is located. The pinned survivor will also be outlined in yellow. Distressed audio cues should also notify others that someone is currently being pinned by a Bull.
- Always mark your targets. As with all special zombies, marking lets players know where a particular threatening zeke is and/or where it is about to go. The red outline can be seen through obstacles and is hard to miss, so press the key that marks them and make their appearance even less of a surprise. A Bull that pins a survivor down will automatically mark both himself and his victim in yellow to others. If you are pinned, only the Bull will be marked yellow. The Bull is a very tough opponent that should generally be prioritized first whenever he appears.
- Communicate. If you have a microphone, use it. Coordinate with others to take down an incoming Bull. If you are pinned, call for them to help.
- Protect NPCs. Non-playable characters such as soldiers or escort characters can be at risk of being pinned down by a Bull should they happen to be in his path while charging towards one of the survivors or after missing them. Should they be pinned, shoot the offending Bull off and free them. While escorts such as Greengold or Svetlana should never go ignored, you are given less of a burden to save soldiers as their survival is ultimately not critical in order to progress forward. Despite this, if it can be helped, you should make an effort to kill any Bulls that have managed to grab a soldier since they do provide some additional damage during swarm scenarios.
Against
- The Bull is considered one of the toughest special zombies you can face. He is extremely well protected, covered head to toe in bullet-resistant riot gear that does not hinder his mobility. His head is protected by a ballistic riot helmet with a face shield that protects him from normally deadly headshots. He is also very strong in his own right, being able to withstand a lot more damage from most sources than normal zekes, and even most special zombies can tolerate.
- However, he also possesses a notable weak spot. The crack in the Bull's armor is located on his back. Shooting directly at the exposed portion will deal increased damage, which can easily kill a Bull with far fewer hits compared to the rest of his body.
- To a much lesser degree, the Bull's head is also a weak point. Unlike the helmet itself, the visor on the front can be destroyed with enough gunfire. Focus enough shots on it and it will break off, exposing the Bull's face for a quick kill headshot. You may need more than one shot to the head to kill the Bull due to his natural bulky health allowing him to take multiple shots to the face.
- Although his left knee appears exposed, shooting it does not seem to deal any more damage than anywhere else on his armored body. Do not try to target his legs and just shoot anywhere else.
- The charge is the Bull's signature ability. If he has chosen his target, they will only have a brief moment to get ready before the Bull breaks off into a full sprint, moving much faster than a sprinting survivor. If the Bull successfully reaches his target, he will lift them up briefly before slamming them on their back over and over against the ground. It should be noted that survivors still take constant damage in the brief moment they are lifted off the ground, not just while they are being beaten to a pulp.
- Before charging, the Bull will always make some loud thumping noises with his foot and hands before roaring loudly. This serves as a warning cue for when he is about to rush. If you are not the one being targeted, prepare to kill the Bull after he is done charging and help anyone that gets grabbed.
- The Bull always keeps eye contact with their chosen target. If you look closely, a Bull will slowly turn to face his target as they try to move around. Moving to the sides while a Bull prepares to charge is a great way to tell if he has decided to become hostile towards you.
- If the Bull cannot reach their target, he will likely run into a wall or other environmental obstacles. He will stumble backward a bit for a few seconds after the impact before continuing to chase the survivors once again. Take advantage of him while he is vulnerable after his crash and shoot at either of his weak points before he manages to recover.
- Though it tends to happen less often, if the Bull charges for too long without grabbing anyone and without hitting any obstacles in his path, he will eventually stop on his own. He will be tired from his charge and will also be left vulnerable for a small amount of time afterward.
- The Bull does not charge in one straight, predictable line unless his target is standing still. The Bull is capable of steering himself while charging. The Bull's movement can be surprisingly fluid, catching players who believe they manage to get out of the way on time completely off-guard by scraping along the edge of walls and obstacles to guide his turn. This allows him to catch survivors that try to hide around a bending corner.
A Bull can be seen about to charge at a fleeing Bunko, only for him to turn around a corner perfectly off-screen, catch her mid-fall, drag her to the lower floor, and swiftly crush her flatter than a pancake
- When dodging a Bull, make an effort to keep your sights on him as much as you can as he approaches you. You may find it easier to avoid his charge while seeing him since you will be able to better track his movement. Attempting to dodge him without looking in his direction, which is still very much possible, may not be as effective since you cannot see where he is going. Without enough experience, miscalculating the distance you run, or just being plain unlucky, you could be caught by surprise when he somehow manages to grab you.
- When the Bull grabs a survivor, he will continue to walk a bit forward before coming to a full halt. If the Bull manages to grab someone in an area where survivors can fall off to more quickly reach a lower area, he will bring them down and have them pinned there. This can be an issue since other survivors may not have an immediate clear sight of the pinned survivor and the Bull as a result of being dragged down to a lower level. This could result in a longer rescue time and will more likely result in an incapacitation/death.
- In another instance, a charging Bull can grab a survivor as they fall off a ledge. If executed properly, the Bull will end up charging off the ledge away from you as he flies towards a wall at the other end of the area. However, if a survivor happens to still be in the way as he charges, they will be pinned.
- There are a few ways to dodge the Bull while he is charging towards you.
- One method is by sprinting in a circular motion. Also known as circle-strafing, this method involves sprinting in a direction facing the Bull and going around him as he charges towards you. You may find it easier to do in areas with more open space.
- Another method is to get behind a solid obstacle or hop over a window. Going over an obstacle that you can climb over or vaulting through a window over a small wall is an easy way to avoid a Bull charge since he will simply crash into it chasing you, allowing you to take advantage of his stunned state after the collision.
- The Bull will shrug off most attacks while charging. Trying to shoot at a Bull that is charging towards you is rarely a good idea unless you fire something real powerful at him as he approaches. In almost all cases, you should focus more on getting out of the way before he reaches you.
- Meleeing a Bull is not particularly effective. Attacking the Bull with melee strikes does not do a lot of damage. On top of that, the Bull cannot be pushed around with regular melee attacks unlike other zekes and special zombies. Thanks to his high health, it takes many hits before a Bull is killed with melee alone. Having all your teammates ganging up on a Bull and striking him repeatedly with all their melee weapons could work, but this would be more suited for when a Bull manages to grab someone and you do not want to risk friendly fire. Even then, however, there are more efficient ways to help a pinned teammate. Remember that the weak spot on his back can still be targeted by melee attacks. Simply being behind him when attacking is enough to target it and he will take more damage from melee attacks. Striking the Bull's back will sound different as well to indicate that is is being hit.
- The Flaregun can stop a Bull from charging. When firing a flare near or directly at the Bull, he will become distracted and likely set on fire. This works while he is charging towards a survivor as well. Shooting the Bull with a flare will cause him to stop. Firing one on the floor will also produce the same effect. However, it has to land near him for it to work, or else he will simply continue to charge without noticing it.
- Survivors that get in the way of a Bull's intended target may become the new target. Bulls always choose their target beforehand and keep to maintain eye contact in their direction. Despite this, it is possible for someone unfortunate enough to get in the way between the two to end up as the newly chosen target. Bulls are not picky about who they grab, so they will immediately begin to smash their victim regardless if it was who they intended to attack or not. If you happen to be "saved" from a charge by your unlucky teammate, react quickly to dispatch the Bull off of them.
- Use heavy weapons. Heavy weapons, while mostly intended for zeke swarms, can also be used against tough enemies. Given the amount of protection the Bull possesses, heavy weapons can easily render it less effective given how much damage heavy weapons can cause. If it can be spared, unload some of your heavy weapon ammo onto the Bull. Using each heavy weapon effectively allows you to maximize damage and successfully kill the Bull with efficiency.
- The Payload Rifle is fairly well suited to be used against the Bull given its somewhat lackluster crowd control capabilities. Focusing its explosive firepower on the Bull instead is highly recommended as the shots will stagger him a lot and kill him with just a few rounds. The Payload Rifle's scope also makes it perfect for killing a Bull from a distance.
- The RPG Launcher is an extremely powerful heavy weapon to use against the Bull. Firing it directly at him will be devastating. Aiming it very close to him should also produce similar results. It is best to use it from a safe distance to avoid friendly fire as well as accidentally hurting yourself.
- The Machinegun can deliver a constant stream of explosive ammo towards a Bull from a distance, constantly tripping him up and prevent him from getting a chance to charge. However, if he is ready to charge, the ammo will do little to stop him as he will absolutely plow through it. Unless you suspect he is extremely low on health, stop firing and get out of the way or else he will grab you.
- The MGL, while powerful, is difficult to directly attack the Bull with. Given that the grenades bounce and are on a timer, it proves much less effective up close. Much as it would be used normally, it is best to use the MGL against a Bull when he is in the crowd from a distance. Shooting the grenades on the floor in front of you to cause them to explode very closely could work, but it does put you at risk of self-damage.
- The Heavy Assault Shotgun is excellent to use while fighting the Bull due to its high damage output and fast fire rate. It is effective at shattering the Bull's bulletproof face shield and leaving him vulnerable to a high-powered headshot. When shot into his back, a few close-range hits will quickly take him down. Against the body, a few hits can easily knock him down, and continued firing will keep him from getting up. However, much like the Machinegun, the fired rounds cannot stop him once he is charging.
- The Chainsaw comes with risks when using one directly against the Bull. Given the fact it is a chainsaw, i.e., a melee weapon, the wielder must get very close to the Bull to do any damage. This can be dangerous while at low health, while surrounded by a bunch of zekes from multiple directions, or both. In higher difficulties, this becomes especially dangerous since it takes fewer hits to incapacitate survivors. However, the Chainsaw is the only melee weapon that is capable of pushing the Bull so head-on confrontation is still possible if you can keep stumbling him without giving him a chance to get up. The Chainsaw is also great to use after successfully dodging the Bull's charge. If you can avoid his signature move and get him to hit a wall, he will be left vulnerable for an easy slash across his back afterward.
- The Flamethrower burns the Bull extremely well done by applying a constant stream of fire. The high damage of the flames will quickly kill a Bull, but if let to roast slowly, the afterburn will eventually kill him as well.
- Use explosives. As some of the heavy weapons have demonstrated, explosives are a great tool to use against a Bull. Depending on the chosen class, the equipment you are provided with is high damaging explosives. If it can be spared, use them against the Bull to cause some serious pain and either greatly debilitate or kill him.
- Explosive weapons such as the Grenade Launcher, Crossbow, and Advanced Combat Weapon are also very effective as the explosions will constantly trip up the Bull.
- The Bull can drain a High Voltage Grid dry. As stated, the Bull can absorb a lot of damage that would normally kill others. While he can be stunned by a High Voltage Grid, the Bull will likely be able to survive if he is not taking damage from other sources. The Bull's high health will not only end up saving him from electrocution but render the grid powerless. If you catch a Bull getting fried, take the opportunity to target his weak spots and kill him to prevent him from using up any further power from the High Voltage Grid.
- Standing on a High Voltage Grid can save you from a Bull. While very uncommon, if you happen to be grabbed while you are currently standing on a powered High Voltage Grid that was placed on the floor, they can stun the Bull off of you. Again, kill the Bull soon afterward to prevent him from draining all the electric power.
Class-specific
Gunslinger
- The Gunslinger starts with a core perk called Gimme a Reason. This perk starts you off with the Frag Grenade. Simple but effective, throw it carefully at a Bull to deal major damage.
- At level 7, the Gunslinger can unlock a perk called Heavy Metal. This perk starts you off with an improved Machinegun with better damage and more ammo. Any and all Machineguns that you pick up throughout the game are also improved with the same benefits.
- At level 10, the Gunslinger unlocks a core perk called Seek and Destroy. This perk's utility gives all teammates an advantage on any special zombies that come within range. Given how dangerous the Bull can be, marking him is especially important to do.
- At level 11, the Gunslinger can unlock a perk called Bounty Hunter. This perk's utility expands across every special zombie in the game. Given how much damage the Bull is capable of soaking up, this perk is substantially helpful when fighting against him.
- At level 16, the Gunslinger can unlock a perk called Judo. This perk allows you to automatically free yourself from a Bull if he has you pinned. The only downside to this perk is that it has a three-minute cooldown so do your best not to get pinned again for some time afterward.
- At Level 20, the Gunslinger unlocks a core perk called My Bad. This perk alleviates half the damage done to teammates you accidentally shoot, making friendly fire less punishing. While you should never shoot at a teammate, accidents happen, especially when it comes to saving a pinned survivor from a Bull. Since the Bull keeps his victim fairly low to the ground while beating the life out of them, it should be a bit easier to shoot him without accidentally hitting your teammate. However, it is still good to have the perk unlocked to minimize friendly fire, especially in higher difficulties where it becomes more unforgiving.
Hellraiser
- The Hellraiser starts with a core perk called Demoman. This perk equips you with C4 and an MGL. These powerful explosives can be used to devastate any Bulls you come across with proper use.
- At level 2, the Hellraiser can unlock a perk called Here Kitty. This perk allows you to draw in zekes towards a C4 charge shortly after deployment. Against the Bull, this can keep him away from charging towards you or your teammates and have him drawn towards a devastating explosion you have complete control over. Blast him once he is lured to the C4 and deal some serious damage.
- At level 22, the Hellraiser can also unlock the perk called Deep Pockets. This perk grants more ammo for heavy weapons that you find. This can be highly beneficial as no matter which weapon you find, the extra ammo can allow you to spare more of its incredible firepower on a Bull but still have plenty left over for regular zekes and/or weaker special zombies.
- At level 26, the Hellraiser can unlock a perk called Heavy Rain. This perk starts you off with an improved MGL with better damage and more ammo. Any and all MGLs that you pick up throughout the game are also improved with the same benefits.
Medic
- At level 11, the Medic can unlock a perk called Second Wind. This perk gives you a chance to get up if you find yourself incapacitated or pinned while everyone else is also in the same predicament. While it could save you in a pinch, know that it will only work a quarter of the time and that if you find yourself pinned/incapacitated again in the next 60 seconds when it does work, you will not be able to benefit from this perk. Additionally, the fact that only you can get up in a scenario where everyone else is in no fighting condition can make this perk seem as though it is only meant to delay the inevitable.
- At level 20, the Medic unlocks a core perk called Fighting Chance. This perk allows you to easily save anyone who is pinned down by a Bull using the Stim Pistol. It is extremely safe to use, and the survivor you shoot at will receive a much-needed temporary health boost.
- At level 26, the Medic can unlock a perk called Secret Ingredient. This perk grants five seconds of the masking effect after firing a stim. The masking effect is great for allowing targeted teammates to disappear, stopping a Bull from charging. Additionally, if a Bull does grab them, firing a stim on them not only frees them from his grasp (thanks to having unlocked the Fighting Chance core perk) but also provides a measure of protection from other nearby zekes. Now masked, you can kill the Bull and make an easy escape without losing any temporary health.
Fixer
- The Fixer starts with a core perk called Mule. This perk starts you off with the Supply Bag. Supply Bags are easy and effective equipment for taking down Bulls as the explosive ammunition provided by the bag makes any primary weapon suitable for direct confrontations with the Bull as the sheer damage will easily stumble the Bull. Aiming for his weak spots will put down the Bull even quicker.
- At level 4, the Fixer can unlock a perk called Night Owl. This perk replaces your Supply Bag in exchange for the Masking Gas Grenade. Using a Masking Gas Grenade allows survivors that walk into the gas to become invisible to the zekes. Masking Gas Grenades can also be thrown at a pinned teammate to easily save their life since the Bull will let go of their target and be unable to retarget them until the gas effect wears off. This will give them the opportunity to kill the Bull and any other zekes nearby. Additionally, the gas will also grant a small amount of temporary health for when the gas eventually wears off. If the masking gas is applied to the Bull's target while he is ready to charge or is in the middle of charging, he will immediately stop in confusion.
- At level 5, the Fixer can unlock a perk called Side Effects. Similar to the Night Owl perk, you gain the Masking Gas Grenade that you can use to save a pinned survivor from Bulls. However, instead of granting some temporary health, the gas now does damage and can kill anything within its area of effect. Given the Bull's immense strength, it may take longer for the gas to kill him or several masking grenades to work.
- At level 10, the Fixer can unlock a core perk called Please Stand Up. Similar to the Medic's Second Wind perk, the Fixer will soon get up if everyone else is incapacitated or pinned as well. However, it is not tied to chance. Thus, apart from the usual 60-second cooldown in between uses, it will guarantee that the Fixer will get back up, even while pinned by a Bull. However, you will still be placed in a less-than-ideal situation where everyone else is either down, pinned, or dead. So just as before, understand you are being placed in a scenario where the odds are against you.
- At level 27, the Fixer can unlock a perk called My Round II. This perk allows everyone, not just the Fixer, to benefit from a little extra ammo for any heavy weapon that they find.
- At level 29, the Fixer can unlock a perk called The Big Five 0. This perk starts you off with an improved Payload Rifle with better damage and more ammo. Any and all Payload Rifles that you pick up throughout the game are also improved with the same benefits.
Slasher
- The Slasher starts with a core perk called Shock Troops. This perk starts you off with the Stun Gun. Typically used for crowd control, it also has the ability to free a pinned survivor from the Bull's firm grasp while leaving him extremely vulnerable to retaliation by either you or your recently saved teammate. You can also use it to stop him mid-charge which could save you if he grabs you at the exact same time.
- At level 11, the Slasher can unlock a perk called Trophy Hunter. This perk functions exactly the same as the Bounty Hunter perk.
- At level 17, the Slasher can unlock a perk called Heavy Metal I. This perk starts you off with an improved Chainsaw with better damage and more fuel. Any and all Chainsaws that you pick up throughout the game are also improved with the same benefits.
- At level 18, the Slasher can unlock a perk called Heavy Metal II. As an alternative to the previous perk, this one starts you off instead with an improved Heavy Assault Shotgun with better damage and more ammo. Any and all Heavy Assault Shotguns that you pick up throughout the game are also improved with the same benefits.
- At level 19, the Slasher can unlock a perk called Battle Cry. This perk allows you to free yourself from a Bull if you have been pinned for five seconds. However, this benefit will see very little mileage in higher difficulties due to the increased damage from all enemies so only use it as a crutch for lower difficulties.
Exterminator
- The Exterminator starts with a core perk called Firestarter. This perk makes you deal 25% more damage to all enemies during swarm events, Bulls included. You also start with Molotovs that delivers a great deal of fire damage.
- At level 4, the Exterminator can unlock a perk called Rage Mode. Although this perk functions the exact same as the Gunslinger's Judo perk, it has a lengthier cooldown of 300 seconds.
- At level 8, the Exterminator can unlock a perk called Heavy Metal. This perk starts you off with an improved RPG Launcher with even greater damage. Any and all RPG Launchers that you pick up throughout the game are also improved with the same benefit.
- At level 9, the Exterminator can unlock a perk called Heavy Metal II. As an alternative to the previous perk, this one starts you off instead with an improved Heavy Assault Shotgun with better damage and more ammo. Any and all Heavy Assault Shotguns that you pick up throughout the game are also improved with the same benefits.
- At level 17, the Exterminator can also unlock the perk called Second Wind. Although the perk functions the exact same as the Medic's version, it has a cooldown of 120 seconds, twice as long as theirs.
- At level 21, the Exterminator can unlock a perk called Broad Shoulders. Similar to the Hellraiser's Deep Pockets perk, it grants more ammo for all heavy weapons that you find. However, the amount of extra ammo gained is slightly less than that of the Hellraiser's.
- At level 29, the Exterminator can unlock a perk called Ghost. This perk will periodically give you a few seconds of masking effect while everyone else on your team is either incapacitated or dead. The masking effect provides you with a temporary safeguard if a Bull is about to charge. However, since the perk functions in intervals, you will find yourself vulnerable before and after the masking effect sets in. Remember that it will not work once you are pinned down.
Dronemaster
- The Dronemaster starts with a core perk called Flying Start. This perk starts you off with a Quadrocopter armed with a Stun Gun. If a Lurker gets too close, the Quadrocopter will stun him for a slighter higher charge cost than normal.
- At level 9, the Dronemaster can unlock a perk called The Big Five 0. This perk starts you off with an improved Payload Rifle with better damage and more ammo. Any and all Payload Rifles that you pick up throughout the game are also improved with the same benefits. However, unlike the Fixer's version of the perk, the Payload Rifle you start off with (and the ones you pick up along the way) will only be half as strong and have slightly less ammo in comparison.
- At level 16, the Dronemaster can unlock a perk called Saving Grace. This perk can save you from incapacitation/death from a Bull's charge and subsequent smashing by covering you in masking gas moments before losing the last of your health. Now masked, you are freed from his grasp and free to kill him and flee to somewhere safer. Remember that there is a three-minute cooldown until it can work again so do not rely too heavily on it.
- At level 19, the Dronemaster can unlock a perk called Saving Grace. This perk can turn the Quadrocopter into a powerful kamikaze. If a Quadrocopter is low on charge (displaying a yellow light) or it can truly be spared, command it to explode right into a Bull to cause high damage.
- At level 23, the Dronemaster can unlock a perk called Eye In The Sky. This perk functions similarly to the Gunslinger's Seek and Destroy core perk but with slightly less range and only when the Quadrocopter is out.
Achievements
| Icon & Name | Description | Gamerscore (XB) | Trophy (PS) |
|---|---|---|---|
 Torero |
Kill Bull during charge | 35 | Silver |
Notes
- The Bull's face shield on his ballistic helmet appropriately resembles a riot face shield given its thinner appearance on close inspection. Despite this, the face shield functions more like a ballistic visor as it is capable of absorbing multiple shots from firearms while most riot face shields are designed to absorb physical impacts such as punches or thrown objects like bricks and bottles. Ballistic face shields are noticeably thicker which gives it the ability to protect its wearer from a few to several shots from firearms and fragments (which would likely apply in the case of the explosive ammunition). A similar point can also be made about the Bull's protective suit. Anti-riot armor is primarily designed for reducing the force of blunt trauma as it consists mostly of padding and not something like Kevlar, a material well-known for its use in bulletproof vests and other ballistic armor. In actuality, his armor will do very little to protect him against the survivors' firearms and even less with explosives as he is shown to be capable of surviving blasts. The discrepancy between the Bull's gear and how they actually function when it comes to protecting him can be chalked up to gameplay since the Bull is designed after a riot police officer but was needed to be balanced with additional defenses to be considered a proper threat against the survivors.
Gallery
")
")
| Zombies/Enemies | |
|---|---|
| Zeke • Lurker • Gasbag • Bull • Screamer • Infector • Bomber • Rat Packs • Booster | |